aquarium
Another Aquarium Photo
ktuli — Mon, 03/15/2010 - 20:40
Got a photo to share today from my small point and shoot camera.
It is still one of my favorite photos, and it goes along with yesterday's photo.
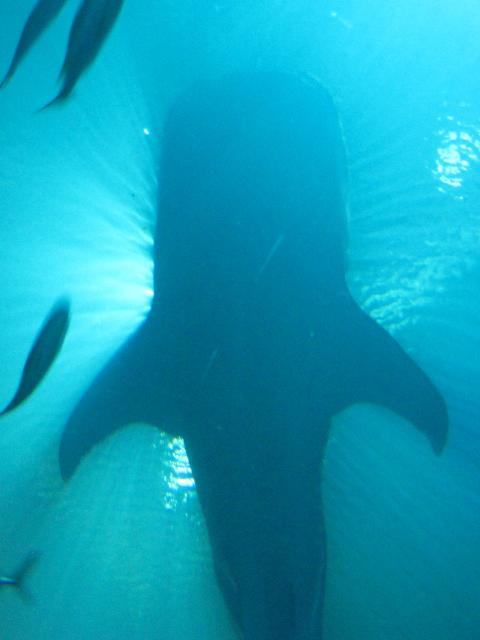
Technical Data: Canon PowerShot SD800 IS Digital Elph at 9.11mm, 1/20 sec at f/4, ISO Auto. No post production. Georgia Aquarium, Atlanta, GA.
I just love the silhouette of this whale shark with the rays of light shining around it.
It makes me want to go diving.
Soon.
- Bill
Let's Talk Convergence
ktuli — Sun, 03/14/2010 - 21:10
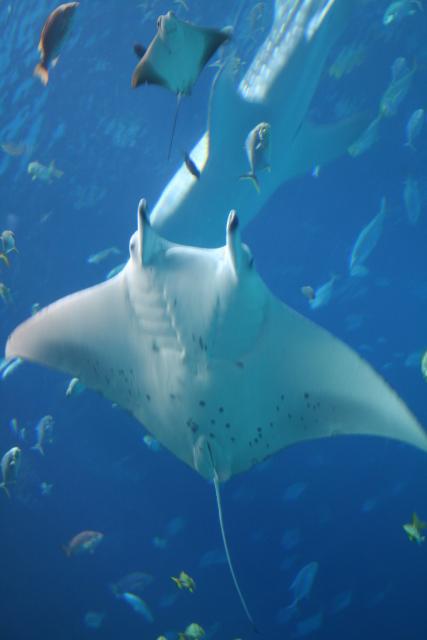
First off, this is not a great photo. It actually is a fairly bad photo. It has a major flaw with it.
Contrary to what this photo looks like, manta rays do not eat whale sharks (unless you're making a B rate sci-fi movie).
The problem with this photograph is known as a convergence or merging.
Basically, when I took this photo, I wasn't paying enough attention. My focus was all on the manta ray (and sadly even that isn't even in focus!).
I did not notice the whale shark entering into the background, and wait too long before tripping the shutter.
The result? A photo that makes it appear that the manta ray is trying to eat a whale shark. Trust me - like I said, that just doesn't happen. Both animals actually eat plankton, or basically small marine animals that aren't any larger than a quarter. Tiny shrimps and other small marine animals that float in the water.
I am going to make up some excuses for myself here...
First, all of the animals in the photograph are constantly moving - this is probably the biggest reason for convergences like this. When you have multiple subjects constantly moving and you are tracking to track one of the subjects, you sometimes lose track of the others and this can happen.
In addition, this photo was taken at the Georgia Aquarium's Ocean Voyager main viewing window. A 23 feet tall by 61 feet wide by 2 feet thick sheet of acrylic (currently the second largest aquarium viewing window in the world) in a darkened room. Multiple factors that all team up for difficult photography.
But in reality, none of these are excuses for converging subjects.
Keep an eye out for this in your own photos and try to avoid it. Definitely don't let it happen with stationary elements in your photos. It is distracting, and quite often ruins photos.
Technical Data: Canon EOS Digital Rebel XT, Canon EF-S 18-55mm f/3.5-5.6 II at 55mm, 1/15 sec at f/5.6, ISO 400. No post production. Georgia Aquarium, Atlanta, GA.
So enough beating up on my own photography for a bit... now I am going to babble a bit about the trip itself.
This particular visit to the aquarium was our second trip. The first time the aquarium did not have the manta ray. However, this second time, we were scuba certified, so we took advantage of the aquarium's Journey with Gentle Giants program.
Yeah, some might call it cheating, but Anya and I have gotten to swim with whale sharks, manta rays, hammerheads, and a ton of other stuff. And as fascinating as whale sharks are, I've always loved manta rays.
During our dive, there was a point at which the manta ray swam no more than a couple feet above me. I managed to roll over on my back and swim underneath it and watch as it glided through the water above me. Has they not had strict rules about touching the animals, I could have easily reached up and ran my hand along its belly.
On one hand, I wished I could have had a camera with me, but on the other hand, I am glad that I didn't so I could just experience the dive.
But underwater photography is something I'll be getting into more and more. Now if only someone would donate a couple Ikelite housings to the cause...
Ok - that is a long enough post for today. I'm going to wander off to look through a new Coral Reef photo book I bought over the weekend.
Enjoy the remainder of your weekend (or here's hoping your Monday is starting off smoothly).
- Bill
Dragons and Depth of Field
ktuli — Thu, 02/18/2010 - 21:19
Time for another episode of "What Hangs on Our Walls at Home!"
For our first anniversary, Anya surprised me by having her parents setup a set of eight photos we had taken on the wall above my desk in our office. Each one was of a different animal from our various zoo trips (which we're hoping to resume as a hobby this spring/summer).
While the subject of this photo was something rather mundane to us at the time - after owning a pet store for about two years, Bearded Dragons aren't really anything exotic to us - what this photo lacks in an exotic subject, it makes up for two fold by being such an engaging image! In particular, by using the depth of field to its advantage.
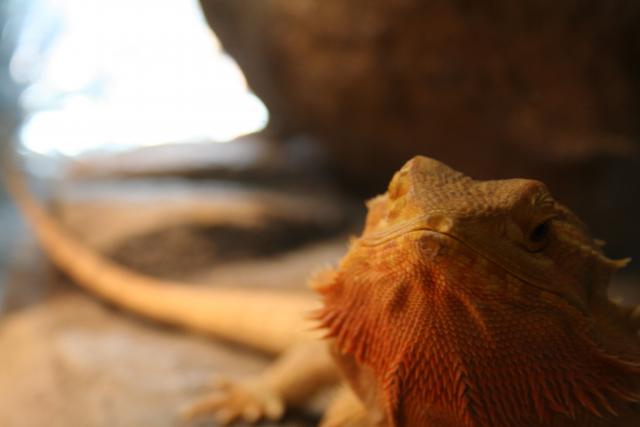
Technical Data: Canon EOS Digital Rebel XT, Canon EF-S 18-55mm f/3.5-5.6 II at 42mm, 1/40 sec at f/5, ISO 400. No post production. National Aquarium in Baltimore, MD.
Why This Photo: I have to be honest and say that I am not 100% certain who took this photo, but the naturally curious behavior of the bearded dragon presented an obviously wonderful photo that I'm sure neither Anya nor myself could pass up.
What Works: Composition is rock solid with the dragon's face sitting perfectly on one of the hot spots for the rule of thirds. But the depth of field is what really makes this photo (I'll discuss it more below).
What Doesn't Work: The exposure in the top left of the photo is a little blown out, but somewhat offsets the dark areas in the bottom right. The focus is the tiniest bit soft (blurry) and would not work for a large print of the photo, but works just fine for the 8x12 print that hangs in the office at home.
So what is all this talk about depth of field? What the heck is depth of field, anyway?
Depth of Field is simply the amount of the photo that is focus. Perhaps some day I'll get into more about what actually causes depth of field, but today we'll talk in non-technical terms. Basically, in this photo, the head and face (and most of the beard) of the dragon is in focus. Everything else is blurred - the rocks in the background, even the dragons leg and tail that are visible. This is referred to as a shallow depth of field - when only a small portion of the photo is in focus.
Which begs the question - why would anyone want a shallow depth of field? Why wouldn't you want everything to be in focus so you could see all the details?
Well, honestly that question is one of personal preference, but in general I feel it is best used as a way to keep the viewer's attention on just the areas of the photo you have in focus. In this case, we wanted to accentuate the face of the dragon.
This can be done one of two ways. You can either completely blur the background so that nothing is recognizable or you can just blur everything that is only needed for context, but not blur it so much that it become unrecognizable.
The trick here is figuring out which to use. In this case, we want to provide the context to keep the viewer looking around this photo, but to keep coming back to the dragon's face. Since most of us know what a lizard's body looks like, the detail is not necessary in the leg and tail, but having it within the frame provides most context to make the viewer more comfortable. I guess a disembodied lizard face would be pretty discomforting to a lot of people... Or the other alternative would be a close-up of just the face of the dragon, which would not be the same kind of photo and might not be as engaging.
Instead, we use the depth of field to help direct the eyes of the viewer to the face of the bearded dragon, but because the blur is not so much that it makes things unrecognizable, the eyes of the viewer are free to wander through the rest of the photo to achieve the context of the photo.
So hopefully that helped explain a bit about why you would want to use depth of field to your advantage. I'm sure I'll have many more examples in the future, so if I did a poor job of explaining and just made you more confused, drop me a comment and let me know so I know what to do better next time.
- Bill

