Reply to comment
What is TTV? And how do I do it?
ktuli — Wed, 10/27/2010 - 20:37
Ok, so I've been showing off this TTV photography, but what does that mean?
TTV literally means Through The Viewfinder as the technique is done by using one camera to take a photograph through the viewfinder of another camera. Theoretically, you could use this technique with any two cameras, but in reality, if you tried it with two modern cameras with modern viewfinders, you'd probably be rather frustrated (nor would you get the nice vintage look that most TTV photographers are going for).
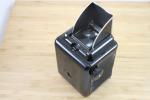
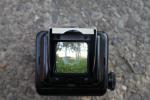
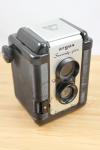 At which point vintage TLR cameras come into play. TLR stands for Twin Lens Reflex (as opposed to modern SLRs - Single Lens Reflex). TLRs - as the name implies - used twin lenses in their construction; one for the viewfinder, and one for the exposure. The TLRs used in TTV photography were waist-level cameras that were designed to be held at waist level and the photographer looked down through a viewfinder at the top of the camera, and with the assistance of a mirror, through the front of the camera's upper lens. Below, you can see my Argus Seventy-Five TLR with the viewfinder cover open, and then a shot looking down through the viewfinder from a distance.
So, to create TTV photographs, you simply line up your modern camera (you don't need an SLR, but of course I recommend one) to shoot down through the viewfinder of the vintage TLR camera. Doing this hand-held is difficult - near impossible. Additionally, you want to eliminate any additional light sources except for what is coming through the TLR's viewfinder so that you get the best possible exposure of your TTV photograph. To do this, you need to build a contraption - yes, as I mentioned before, that is what TTV photographers call the cardboard frame used to merge the two cameras for easier setup of the shot.
Your contraption will differ based one several factors - first, depending on what TLR camera you find (more on that in a bit), and the lens you are going to use on your SLR camera (you can use a compact camera, but from what I have read, it is more difficult). I'll discuss those points in a little bit, but for now, we'll look at the general construction of the contraption.
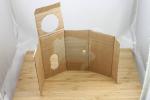 First, you need to measure the outside dimensions of your TLR to build a frame (I used cardboard, but other materials will work if you're looking for something more robust) that will wrap around the outside of the TLR.
Next, you need to measure the height that your contraptions needs to be. This is where the lens you select comes into play. I highly recommend a macro lens if you have one. The reason for this is you want a lens that can focus on the viewfinder of the TLR as closely as possible. You can start out by looking up the specifications of your lens to see what the manufacturer lists the minimum focusing distance as, or you can (and probably should to be sure) measure it yourself. To make the measurement yourself, place your TLR on a table and use your camera to look down through the viewfinder. You want to accomplish two things here - fill as much of your SLR's frame with the viewfinder of the TLR - if you can get it to almost touch the top and bottom of the frame, you're set! (but remember to not overfill and cut off those nice rounded corners of the viewfinder). Once you've got that worked out, measure the distance either from the front of your lens or front of your camera to the table (it helps to have a second person there to do the measuring). The reason I recommend a macro lens is because they generally have a small minimum focusing distance and helps to keep your contraption smaller and more manageable. I used my Tokina 35mm macro since its minimum focusing distance is only 5.5 inches.
The instructions from my book missed a couple suggestions that I found helped. First, give yourself an extra flap to overlap to close the contraption around your TLR - this helps to block light leaking in through a corner. Second, I built my contraption to go all the way to the bottom of the TLR which means when I measured the minimum focusing distance above, I could just measure to the table and not worry about trying to measure to the viewfinder and then add an amount to slide over the TLR. Also, I found that (at least with my Argus) I was able to simply press it against the cardboard to mark where I needed to cut out for the lenses and the film advance knob on the side of the lens.
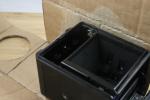 Once you've got that all figured out, the last thing you need to figure out is a top flap to cover the top, which you'll cut a circle opening in for your lens to point through. Measure out your contraption on carboard, cut it out, use a craft knife to cut out the openings for the lenses and any knobs that need to push through (I removed the knob and then replaced it after sliding the cardboard into place - see photo to the right), and score the lines to fold along the corners.
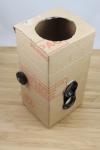 At this point, you can put your contraption on your TLR and try it out. If you're lucky or good, you'll be ready to go... if you're like me, you'll start working on your second contraption because you messed something up on the first one. ;)
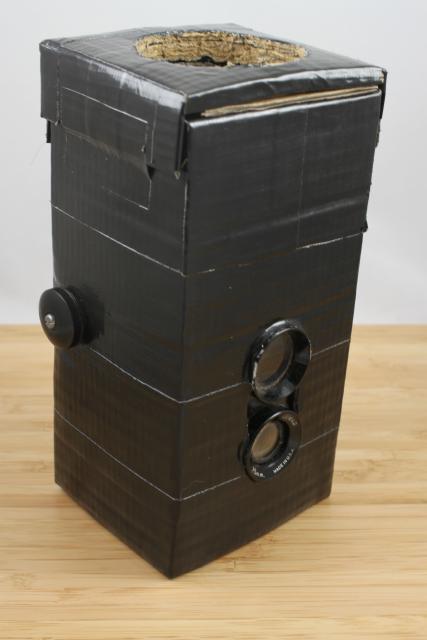 Finally, if you're like me, you'll want to break out the black duct tape and cover your whole contraption in the black tape. This actually does more than just make the contraption look a lot nicer. It helps to add a bit more stability and strength to the cardboard, and helps to block any light from leaking through and making your exposure more difficult. But it really does make it look a lot nicer!
Geez - this really has turned into one long post - I apologize for that, but I really wanted to to be as thorough as possible. Hopefully this has helped and you feel you could use this to get started with TTV photography.
Before I wrap this up, though, I do want to provide a couple more bits of information that will probably be helpful. First, don't spend a lot on your TLR - you can usually find these at flea markets for very little. I went to a single flea market and came home with four different TLRs for a mere $20 total (granted only two of them will work for TTV, but still). Also, since you don't use the exposure lens, the camera doesn't even need to work, so don't spend extra money just to get a camera that is labeled to work - get one that "doesn't work" just to save a few bucks... all you care about is that the viewfinder works. Which is the last point about the TLR - don't clean the camera! Leave that dust and dirt and scratches on the lens and viewfinder - it adds to the vintage look of the photos.
Also, when you are set to shoot, try the following on your DSLR. Use Liveview if you have it - it makes it much easier to compose the shot and see what is in your frame. If you do use Liveview, be sure to take extra batteries as Liveview will chew through batteries quickly. I'd also recommend turning up your auto-power off setting so that your Liveview doesn't turn off right as you're about set to take the photo. Next, if your camera has it, turn off the auto-rotate feature. Since your camera will be pointing down, the sensor that measures what orientation you're in is easily confused, and simply turning this feature off eliminates the photos being rotated when you didn't want them to be. And lastly, I was finding that I needed to "under" expose my shots. This is probably because I was using evaluative metering mode, perhaps try partial or spot metering instead. But if not, I found I was consistently "under" exposing by up to 2 full stops. This helped to give more of that vintage feel, but also made for more reasonable shutter speeds since the TTV generally makes for less light coming through to begin with - I spent much of the day at 1/10th of a second shutter speed.
Again - sorry that this was a very long post. There was just so much information here, and I sometimes get a little wordy. To make it up to you, this does mean that the next couple days worth of posts will be focused on just the photos without having to spend time discussing the details here.
I do hope the details helped though, and if anything at all is confusing, please don't hesitate to post a question in the comments and I'll do my best to explain better!
Tune in tomorrow for more fruits of these efforts.
- Bill

